- Apr 25, 2015
- 1,846
- 2
- 2,203
- 327
What an absolute cluster cluck of a chicken problem!
Here is my simple solutions (even for little old ladies):

 ciphers.pw
Keep in mind, upgrading the system could create instability without following other advice mentioned in the link just above.
Hope this was SIEMple to follow register / ask questions and I will make a video to help you, remote assist, whatever you want.
Here is my simple solutions (even for little old ladies):
- Go purchase a dedicated server from OVH, make sure you have at least 16 CPU cores, 16GB RAM, and 1TB+ of disk - https://www.ovhcloud.com/en/bare-metal/rise/rise-4/ or browse for your own lesser/greater specs: https://www.ovhcloud.com/en/bare-metal/prices/
- Purchase some failover IP addresses through OVH https://ca.ovh.com/manager/dedicated/#/configuration/ip?tab=ip - make sure to purchase it for the server IP you have just bought above.
- You want to have your IP ranges assigned as failover for the gateway (your dedicated server)
- To the far right of an IP in your failover range, select the "..." click "Add a virtual mac" --- 1. Create a new virtual MAC --- 2. "ovh" for type --- 3. name this "alien" --- 4. Confirm
- Make sure to have your purchased OVH dedicated server formatted to be running Windows, Hyper-V Server 2019.
- Install Windows Admin Center on your dedicated server as detailed here:
- Once you have Windows Admin Center installed, you will want to open PowerShell
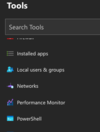 (bottom of this image)
 - Login to use your Hyper-V admin account, make sure to type these commands:
Code:$ProgressPreference = 'SilentlyContinue' cd C:\ wget https://dlcdn.alienvault.com/AlienVault_OSSIM_64bits.iso -UseBasicParsing -OutFile av.iso - From within Hyper-V, we are going to create a new VM (+ New)
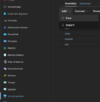
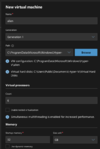
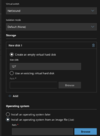
- Select for the virtual switch - your externally configured Hyper-V virtual switch, slightly beyond scope but feel free to post a reply on this thread if you need help!
- Let's select "Browse" for the (.iso) file to install (AlienVault)
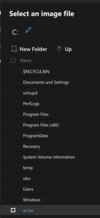 select the "av.iso" after click the C: up top - then just click "Ok"
- If you copied all my similar settings from images above, select "Create"
- Hit the check on your newly made system within "Virtual Machines" and select Settings
- Go into your Network configurations and you will see an "Advanced" option - hit it.
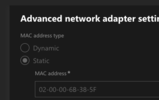 enter your virtual mac address you generated earlier on (it will be different than mine) - make sure to hit Static obviously. This will be edit-able only when the virtual machine is off.
- Save the Static virtual mac, then go ahead and start your "alien" virtual machine by going inside "Virtual Machines", checking alien, then select Start
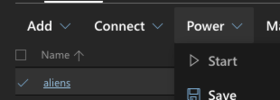
- Ignore that my server is 'aliens', I promise 'alien' is what I meant.
- Now select the "Connect" option to the left of Power and then select Connect.. you will be prompted for a login - go ahead.
- Navigate through all these basic settings like United States, American English, etc.. keep going until your at an IP Address option
- The IP address will NEED to be the IP address matching up with your vMac we generated earlier.
- Netmask can be 255.255.255.255
- Leave the gateway blank for now.
- The name server address can be left blank also.
- Set a root pwd, continue, select your timezone, continue
- Finally AlienVault will take some time to finish the install, this may take some time. You might think it is frozen at "cdsetup", or the progress bar is not moving - walk away and eat a snack, then play basketball. It will eventually finish, I PROMISE!
- When it finally seems like it is done you may notice this:

- Just keep on waiting, it may take many minutes - let it just do its thing.
- Now time to login to the machine (root is the username), the password is what you set during setup. We are going to select the menu item 3, just hit the "3" key on your keyboard (jailbreak system), hit enter, and it will ask you if you are sure / continue, yes.. just go along. At the bottom of the screen, you have a terminal - do the following commands and edit into the files. Ctrl + X (exit / save file changes).
-
Code:
nano /etc/network/interfacesAnywhere you see 5.6.77.8, place the IP address matching your vMac. Anywhere you see 123.4.5.254, place the host system gateway. Keep in mind that your gateway is going to match your dedicated server IP address, but the LAST octet will be .254 (no matter what) so if your dedicated server IP is 12.34.55.83 I DONT GIVE A F***, your gateway will be 12.34.55.254 - trustCode:auto eth0 iface eth0 inet static address 5.6.77.8 netmask 255.255.255.255 broadcast 5.6.77.8 post-up route add 123.4.5.254 dev eth0 post-up route add default gw 123.4.5.254 post-down route del default gw 123.4.5.254 post-down route del 123.4.5.254 dev eth0
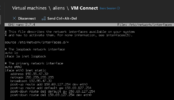
-
Add this to the bottom of the file:Code:
nano /etc/resolv.conf
NOTICE!!! This change will be wiped out at restart likely. The persistent solution is modifying this file:Code:nameserver 8.8.8.8

- If anyone has questions, please let me know but once you reboot - your server will be working! This is how to get servers up and running!!

Building Proxmox via OVH
This is a thorough guide to be a baller af server master. 1. Connect into your Proxmox host via SSH: ip addr | grep "inet " | grep -v " 127" | cut -d " " -f6 | cut -d "/" -f1 This is your host's public IP address, so let's say your IP is: 158.1.1.157 Then your server's gateway would be...
 ciphers.pw
Keep in mind, upgrading the system could create instability without following other advice mentioned in the link just above.
Hope this was SIEMple to follow
Last edited: